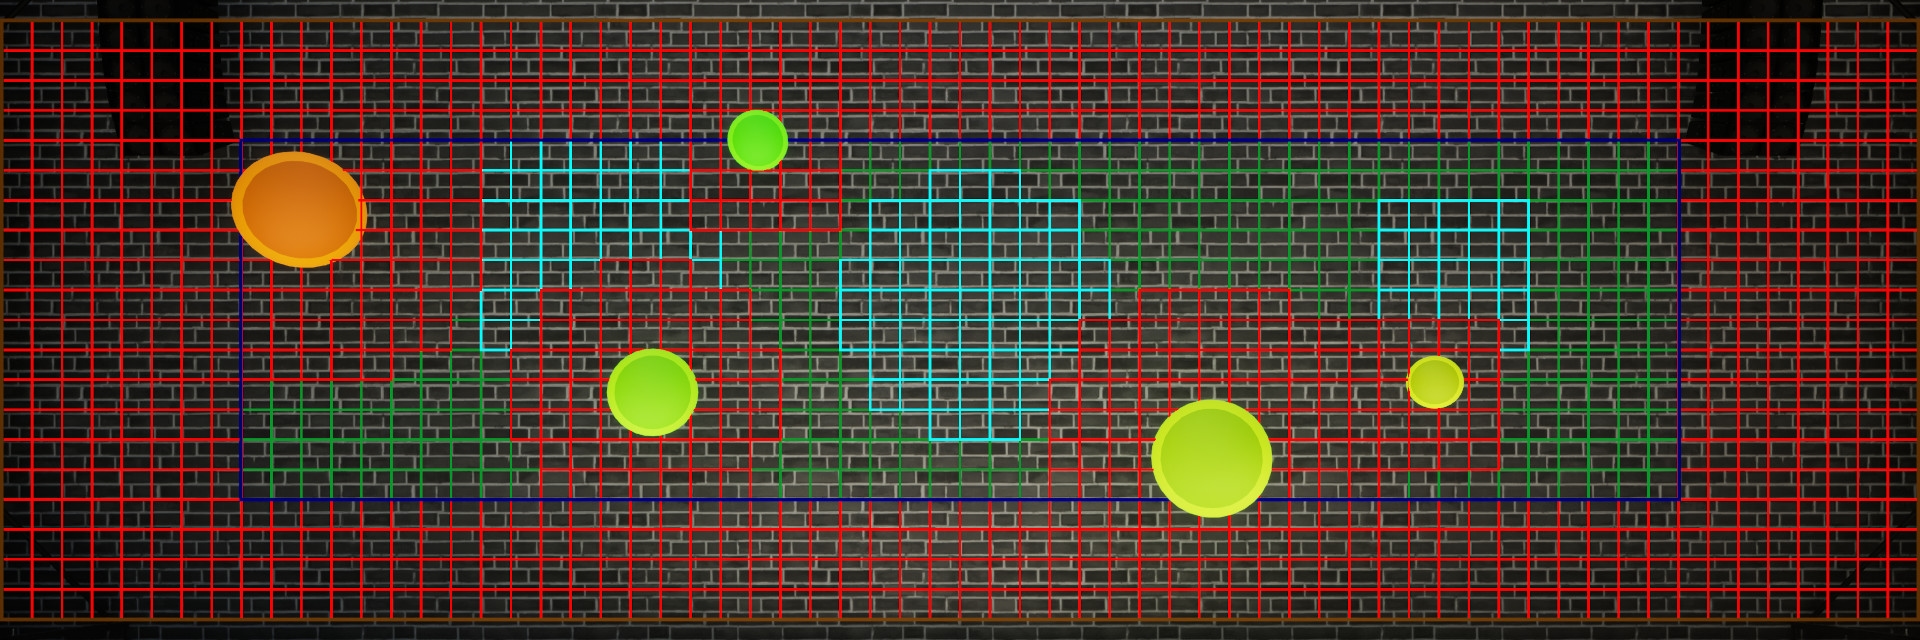
This article explores the foundational elements of BeatShot's target spawning system. It provides an overview of the key classes involved, detailing their roles and the various states they can occupy. It also covers the reasoning behind the chosen conventions and their practical applications, while clarifying the boundaries between different systems and explaining the rationale for defining those boundaries.
Classes
This section gives a brief description of all classes involved in BeatShot's target spawning system and establishes the context needed for the following sections.
The area where targets may spawn is represented as a two-dimensional spatial grid, known as the total spawn area. A Spawn Area is simply a segment of this spatial grid.
When fully utilized, the total spawn area represents 3.2 million individual points.
- Spawning, activating, deactivating, and destroying targets
- Stores references to targets using a map based on the target’s FGuid (globally unique identifier)
- Managing the size of the total spawn area, which can change during a game mode
The Target Manager is an actor that represents the highest level of the target spawning system. It has several responsibilities including:
This class delegates responsibilities to several components described in the following three sections.
The Target Manager uses seven box components, which can all be considered two-dimensional planes since one of their three dimensions is always zero.
The middle red plane in Figure 1 corresponds to the total spawn area, or the two-dimensional area encompassed by all Spawn Area objects.
The other six components form a rectangular prism (blue, green, front & back red planes in Figure 1) used to confine moving targets. I would've preferred to only use one box component, but "hollow collision" is not feasible. They form a closed volume but are offset in Figure 1 for visibility.
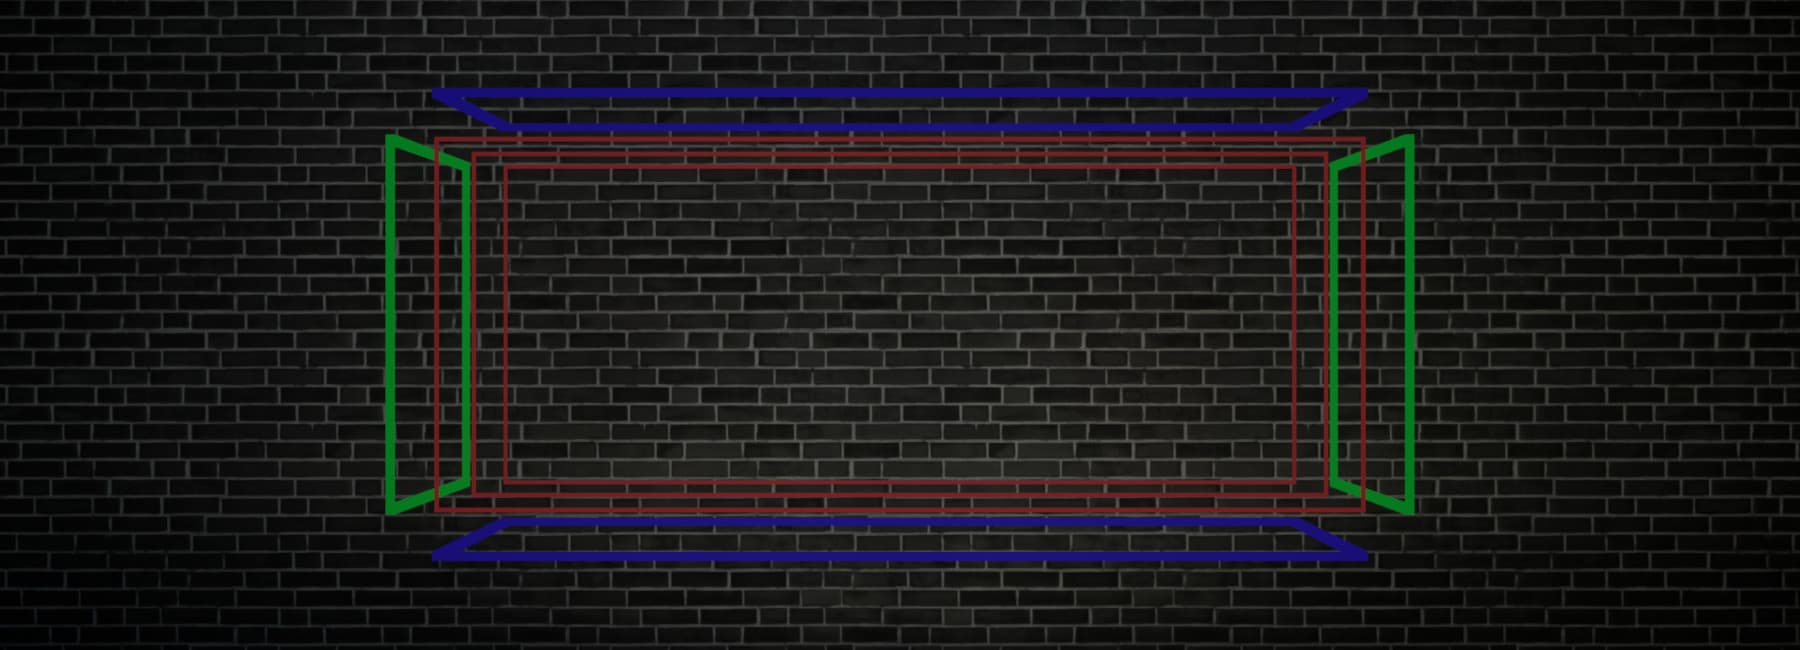
Figure 1:
Target Manager Box ComponentsThe Reinforcement Learning Component is an optional feature available to custom game modes (Enable AI).
It uses the Q-Learning algorithm to identify the target spawn locations that the player is least likely to successfully destroy, based on past performance.
The component utilizes a two-dimensional array where each element in the array represents the reward from spawning a target at location A and subsequently spawning another target at location B. While a simpler approach could involve only considering the reward for spawning a target at one location, using the previous spawn location provides better predictions, even though it requires more training time. The array scales the total spawn area down to a 5x5 grid, resulting in 625 elements (as opposed to the 25 elements of the simpler approach).
The Spawn Area Manager Component creates and manages all Spawn Area objects. It contains the logic for choosing where to spawn targets and which targets to activate.
The Spawn Area Manager does not interface directly with targets. Instead, a target’s FGuid is mapped to the Spawn Area in which it resides, meaning that there can only be one target per Spawn Area at any given time.
Spawn Areas must frequently be combined and filtered based on their current state. To facilitate this, I chose to store Spawn Areas in TSets to utilize Union, Difference, and Intersection functions. The elements in the set are hashed using the Spawn Area’s index since a Spawn Area may reference different target FGuids throughout its lifetime.
This component was previously part of the base Target Manager class, but as the class grew, it made sense to encapsulate all Spawn Area-related functions into a separate component.
The target is the only visible actor in the target spawning system (in the release build).
A target may receive damage from a player or itself if it times out. In either case, it notifies the Target Manager when damage events occur. Targets control their color using curve assets and timelines. Like the Target Manager, this class uses components detailed in the following sections.
The Projectile Movement Component automates target movement. The Target Manager calls ATarget::SetTargetSpeedto change a target's speed, and ATarget::SetTargetDirectionto adjust a target's velocity or direction.
To maintain the same velocity that a target had prior to bouncing into an obstacle, UProjectileMovementComponent::OnProjectileBounce is overridden.
Using the Ability System Component (ASC) for each target might seem excessive, but it integrates well since characters also use the ASC, allowing communication between their ASC and the target ASC.
The ASC facilitates applying immunity to the target for different damage types and supports tracking attributes like health.
To learn more about how the ASC (part of the Gameplay Ability System plugin in Unreal Engine) is used in BeatShot, check out the Gameplay Ability System Overview article.
The health component is initialized with Ability System Component so that it can monitor for changes to the target's health attribute. The target binds the health component's FBSDamageEvent delegate to its HandleDamageEventfunction. If you aren't familiar with delegates, this means that when the target takes damage, the function will be triggered.
The FBSDamageEvent delegate passes an FDamageEventData structure containing the following data:
- The actor who instigated the damage
- The type of damage taken
- The old value of the health attribute
- The new value of the health attribute
- A pointer to the FGameplayEffectSpec
With this setup, the target can identify if it was the actor who caused the damage event. This is crucial because the target damages itself if it expires. The FGameplayEffectSpecpointer allows receivers of this structure to query the Effect Spec's dynamic asset tags.
The game mode spawns the Target Manager when the map loads. It initializes the Target Manager each time a game mode starts. It also configures the audio analyzer and notifies the Target Manager whenever a beat threshold is met.
States
Targets States
Targets can be in one of two states:
- Activated: The target is damageable by the player and can be displayed in various colors based on its current lifetime position.
- Deactivated: The target is not damageable by the player and is shown as purple in Figure 3.

Figure 2:
Activated target colorsSpawn Area States
Spawn Areas essentially function as data containers. The Target Manager notifies the Spawn Area Manager when targets are spawned, damaged, or when their state changes. The Spawn Area Manager updates the state of Spawn Areas based on the information it receives from the Target Manager.
Spawn Areas have more states than targets because they also track where targets have been previously:
- Managed: Mapped to a spawned target and can be either activated or deactivated. All visible targets are managed.
- Activated: The mapped target is activated, shown as green squares in Figure 3.
- Deactivated: The mapped target is deactivated, shown as red squares in Figure 3.
- Recent: Does not reference a target and is not valid for spawning or activation, shown as light blue squares in Figure 3.
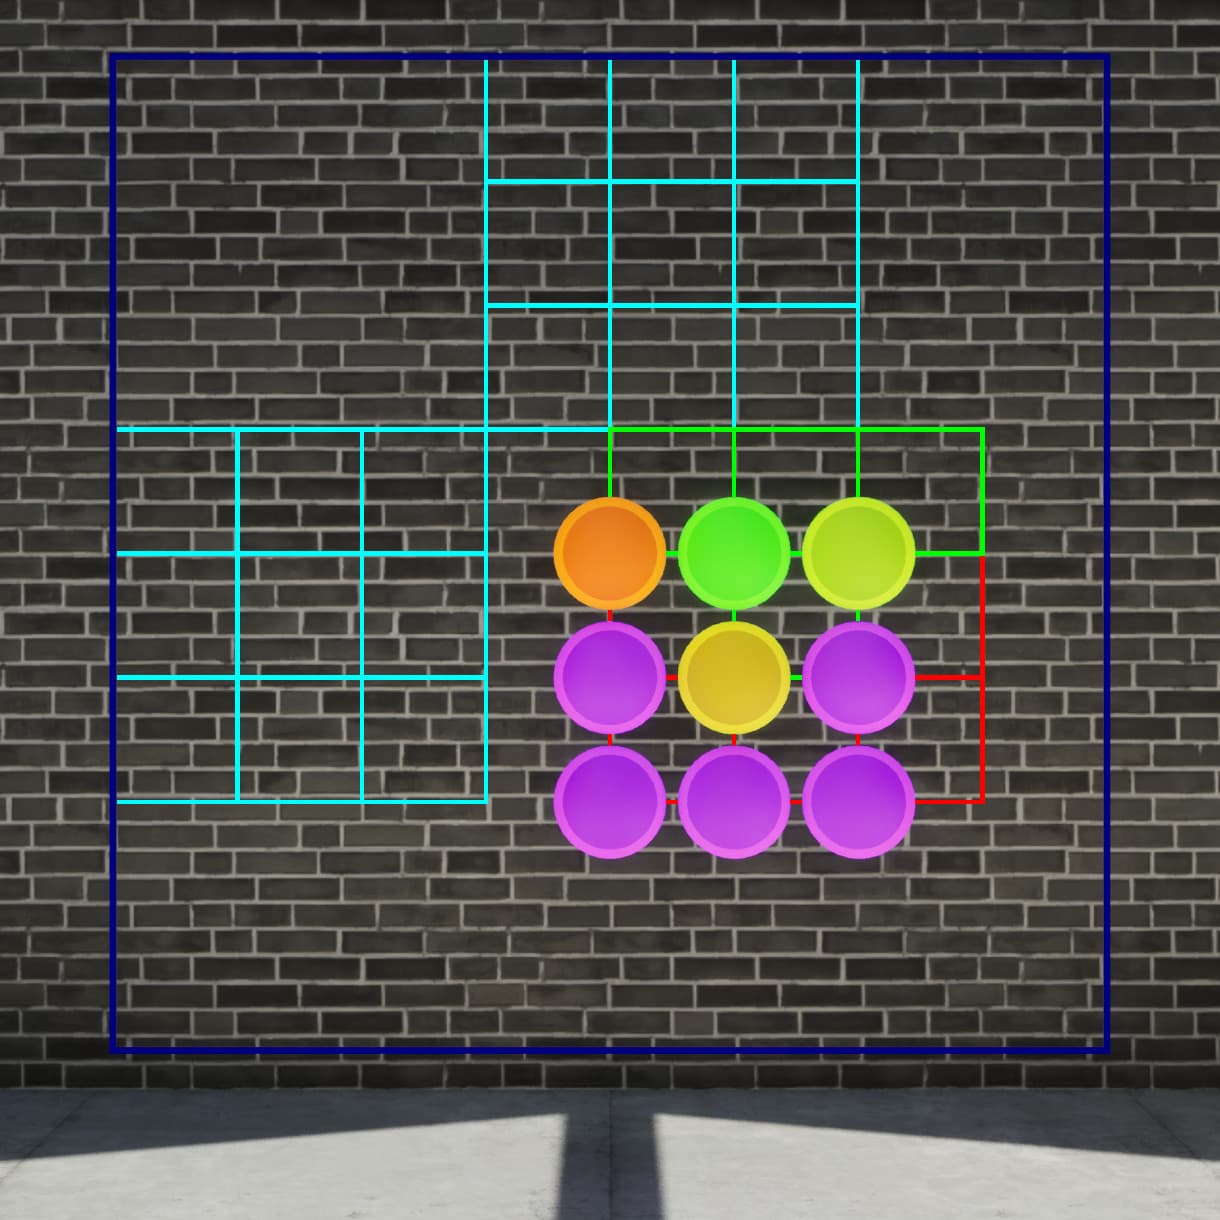
Figure 3:
The ClusterBeat game mode showing various Target and Spawn Area statesConditions and Responses
Target behavior is manipulated using conditions and responses.
Conditions
- ETargetDeactivationCondition: An event that triggers a target to transition from activated to deactivated.
- ETargetDestructionCondition: An event that causes the target to be destroyed by the Target Manager, regardless of its current state.
Conditions dictate how long a target remains relevant and come in two forms:
If multiple conditions are specified, the condition that occurs first will trigger either deactivation or destruction.
enum class ETargetDeactivationCondition : uint8
{
    OnAnyExternalDamageTaken,
    OnExpiration,
    OnHealthReachedZero,
    OnSpecificHealthLost,
};
enum class ETargetDestructionCondition : uint8
{
OnExpiration,
OnAnyExternalDamageTaken,
OnHealthReachedZero,
OnDeactivation
};Examples
- OnSpecificHealthLoss as the only Deactivation Condition:
- Health Loss Required for Deactivation = 100, Maximum Target Health = 300
- If OnHealthReachedZero is the only Target Destruction Condition, targets are deactivated at health levels of 200, 100, and 0.
- If OnSpecificHealthLost and OnExpiration are Target Destruction Conditions, targets are deactivated at health levels of 200, 100, and 0 when damaged by the player but will be immediately destroyed if the player fails to damage the target while it is activated.
- Health Loss Required for Deactivation = 100, Maximum Target Health = 300
- OnAnyExternalDamageTaken and OnExpiration as Deactivation Conditions:
- Targets are deactivated when damaged by the player or when their maximum lifespan expires, whichever comes first.
Combining both deactivation and destruction conditions allows for a target to be reactivated multiple times if the player successfully damages it, while also ensuring immediate destruction if the player fails to damage it during activation.
Responses
Responses specify what a target does when it reaches a certain state. There are three kinds of responses:
- ETargetSpawnResponse: Modification applied to a target when it spawns. This is always applied and occurs only once in a target's lifetime.
- ETargetActivationResponse: Modification applied to a target when it is activated. There is no restriction on how many times this can occur in a target's lifetime.
- ETargetDeactivationResponse: Modification applied to a target when it is deactivated. There is no restriction on how many times this can occur in a target's lifetime.
Responses at each state in a target's lifecycle allow for modifications such as target movement and size changes to be applied only when activated, only when deactivated, both, or neither. When a target is destroyed, deactivation responses are always applied.
enum class ETargetSpawnResponse : uint8
{
    ChangeDirection,
    ChangeVelocity,
    AddImmunity,
};
enum class ETargetActivationResponse : uint8
{
RemoveImmunity,
AddImmunity,
ToggleImmunity,
ChangeDirection,
ChangeVelocity,
ApplyConsecutiveTargetScale,
ApplyLifetimeTargetScaling,
};enum class ETargetDeactivationResponse : uint8
{
RemoveImmunity,
AddImmunity,
ToggleImmunity,
ApplyDeactivatedTargetScaleMultiplier,
ResetScaleToSpawnedScale,
ResetPositionToSpawnedPosition,
ResetColorToInactiveColor,
ShrinkQuickGrowSlow,
PlayExplosionEffect,
Destroy,
HideTarget,
ChangeDirection,
ChangeVelocity,
ResetScaleToActivatedScale,
ResetPositionToActivatedPosition,
Reactivate,
};
Target Distribution Policy
The Target Distribution Policy determines how targets are distributed within the total spawn area and individual Spawn Areas. A target does not need to fit inside the Spawn Area it is associated with.
Full Range
- Targets can spawn anywhere within the Spawn Area.
- The Spawn Area size is always 50x50.
- This is primarily because 50x50 accommodates the smallest possible target size option.
- Since the spatial grid has fixed maximum dimensions and increment values, there will always be a maximum of 1280 Spawn Areas.
Grid
- Targets always spawn at the bottom-left vertex of the Spawn Area.
- The Spawn Area size is based on the number of targets, target size, and grid spacing.
- Grid is a subset of FullRange, limited to one specific position within a Spawn Area.
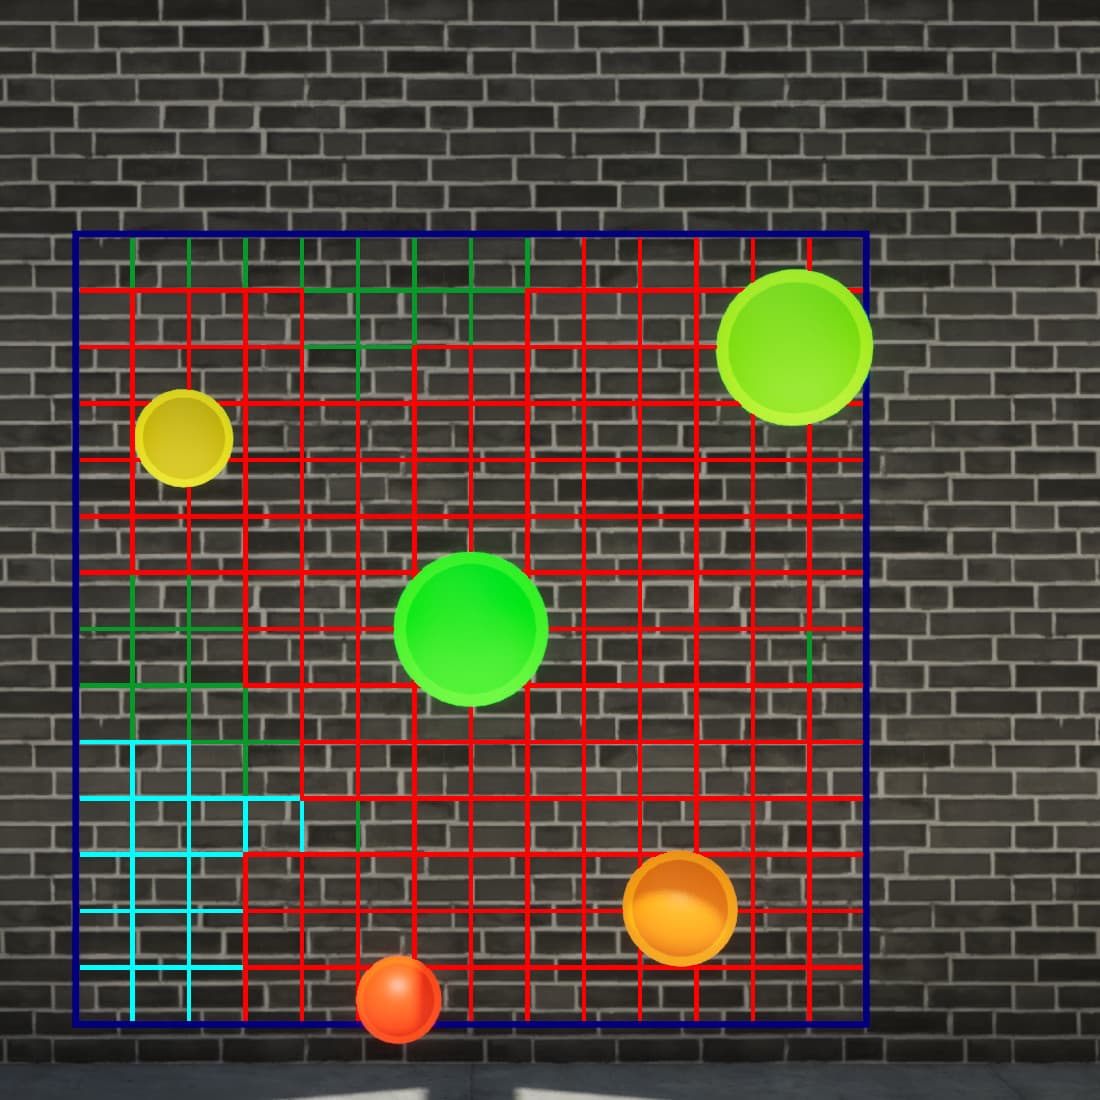
Figure 4:
FullRange (Spawn Area size: 50x50)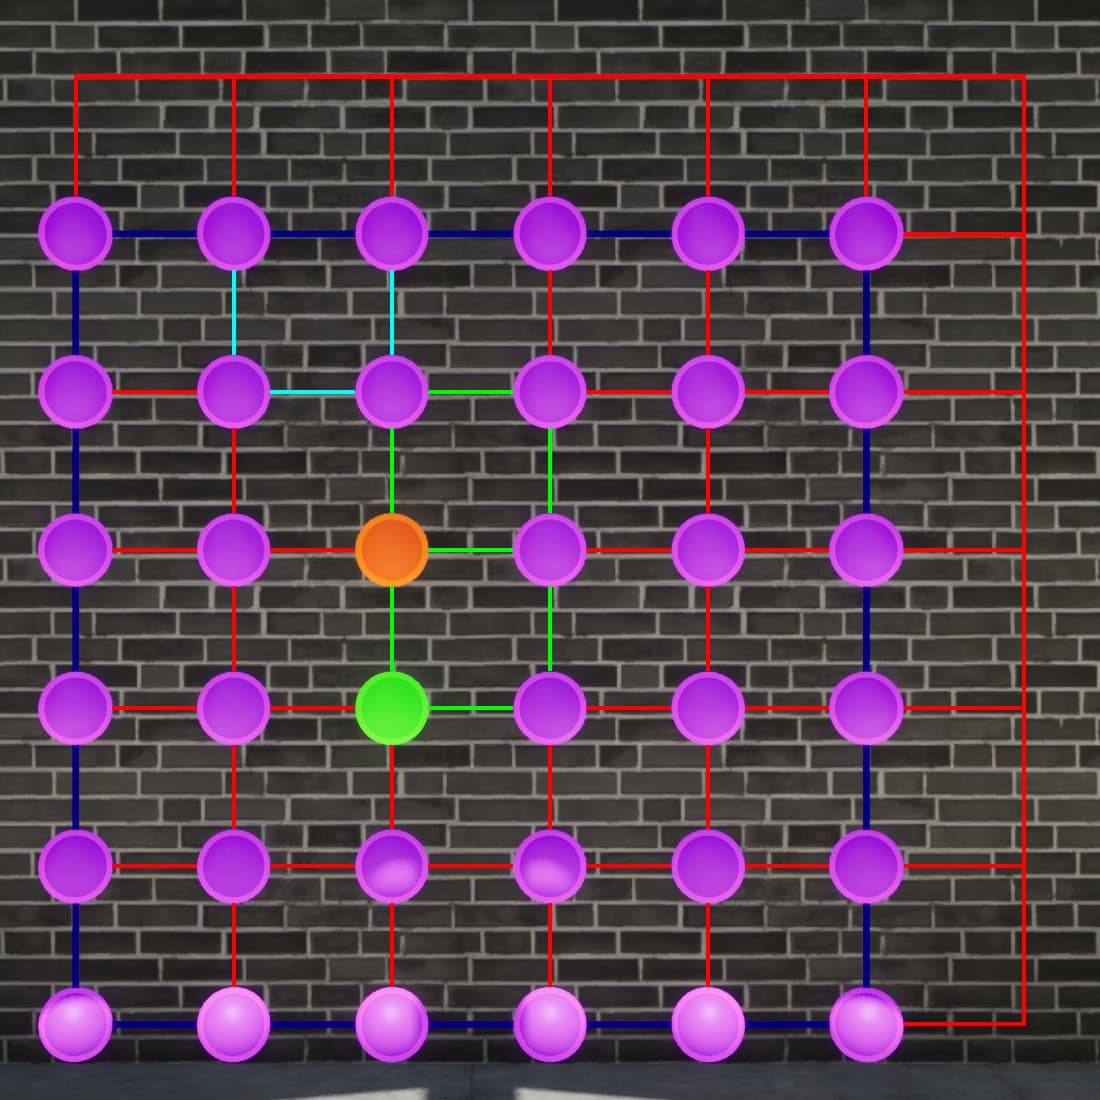
Figure 5:
Grid (Spawn Area size: 145x145)HeadshotHeightOnly and EdgeOnly are the other two types of Target Distribution Policies. Similar to Grid, they are also subsets of FullRange but have much simpler implementations.
Spawn Selection
- Random: Randomly chooses an available Spawn Area.
- Bordering: Chooses a random bordering Spawn Area based on recent Spawn Areas.
- RandomGridBlock: Chooses a random block of targets.
- NearbyGridBlock: Chooses a nearby block of targets based on recent Spawn Areas.
The Spawn Selection setting determines where to spawn targets for game modes that use a Grid Target Distribution Policy and a RuntimeOnly Target Spawning Policy. There are currently four implemented modes:
Batch spawning is a setting that causes targets to only spawn when there no more managed targets are left to activate. Batch spawning combined with RandomGridBlock or NearbyGridBlock creates a synergistic interaction used to create the ClusterBeat game mode, as shown in Figure 6.
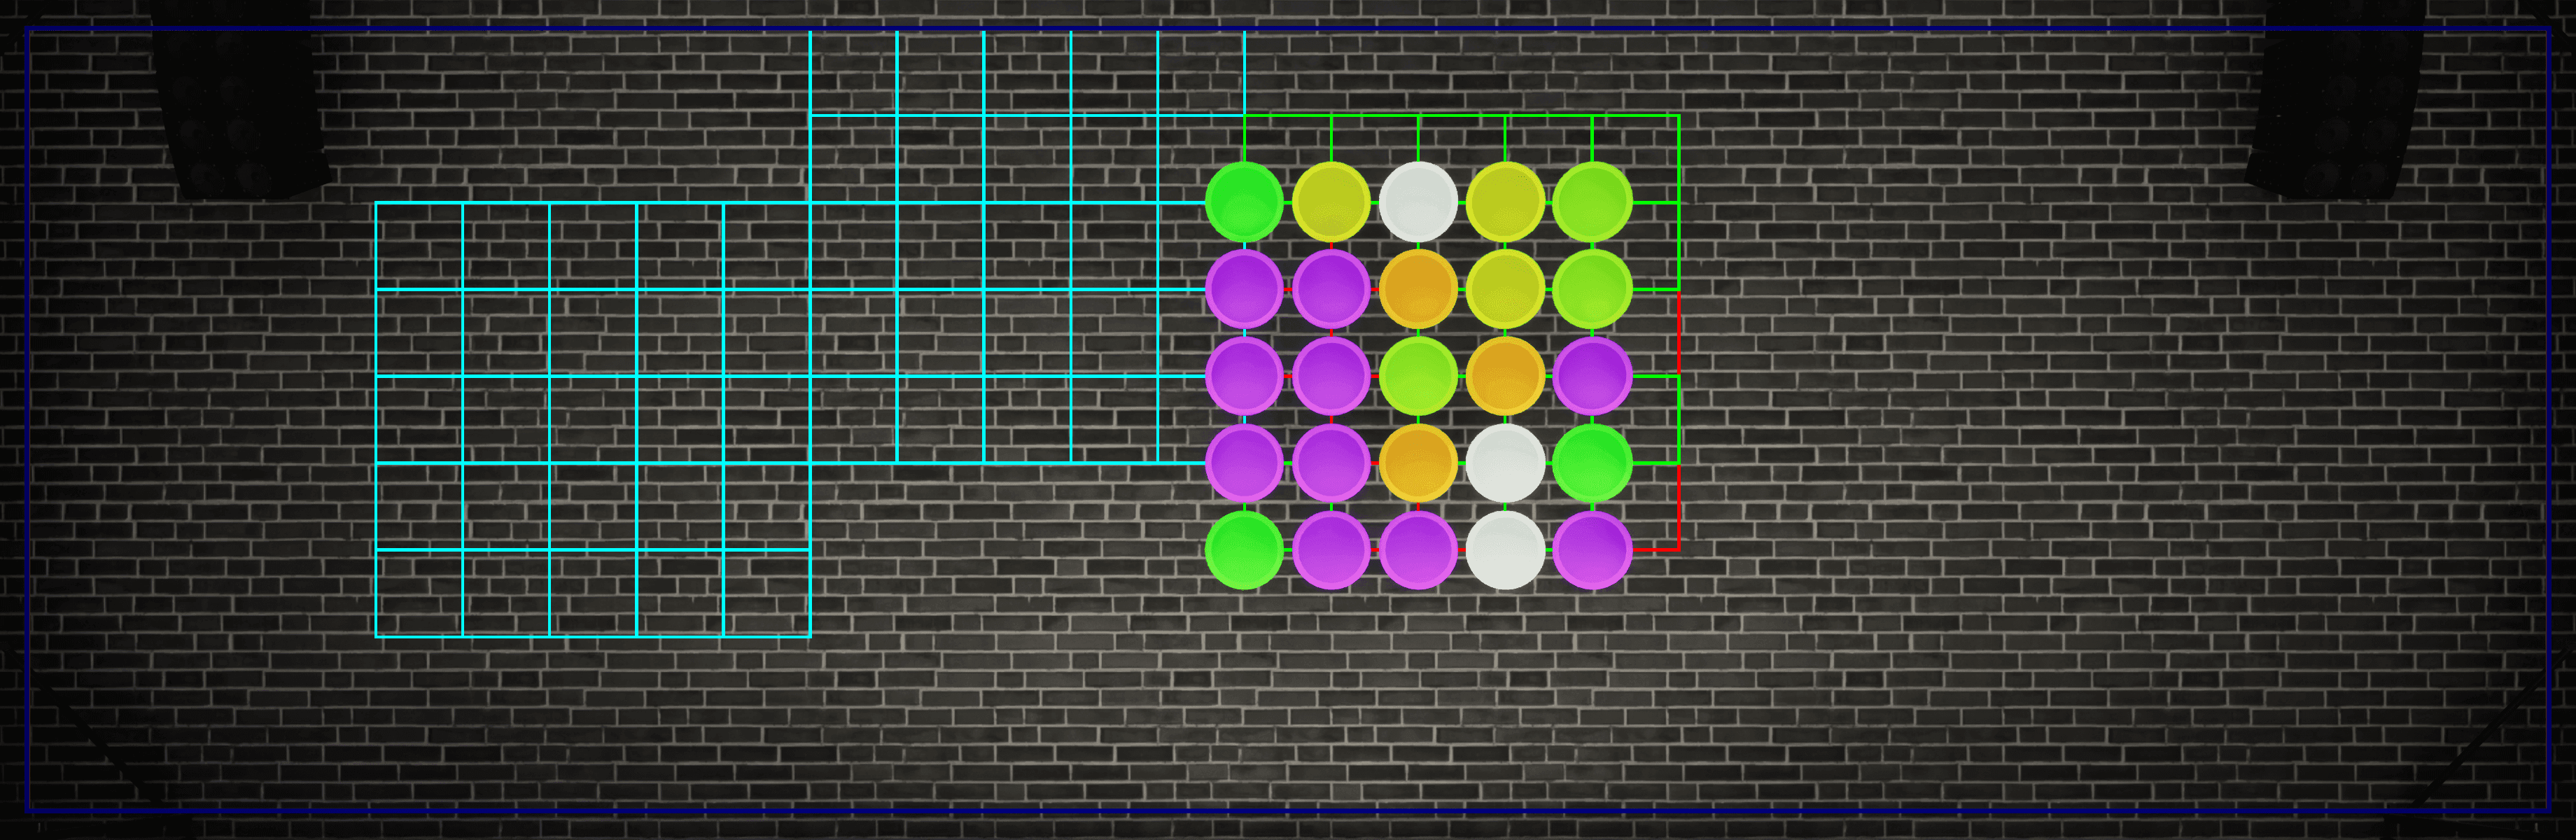
Figure 6:
ClusterBeat game mode with 25 targets spawned at a time using NearbyGridBlock and batch spawningWhen implementing the Spawn Selection setting, I created a console command to log a matrix visualizing Spawn Area states. The numbers correspond to each Spawn Area index and indicate a valid spawn location, while underscores indicates that the Spawn Area is not a valid spawn location. Figure 7 shows the console output corresponding to Figure 6.
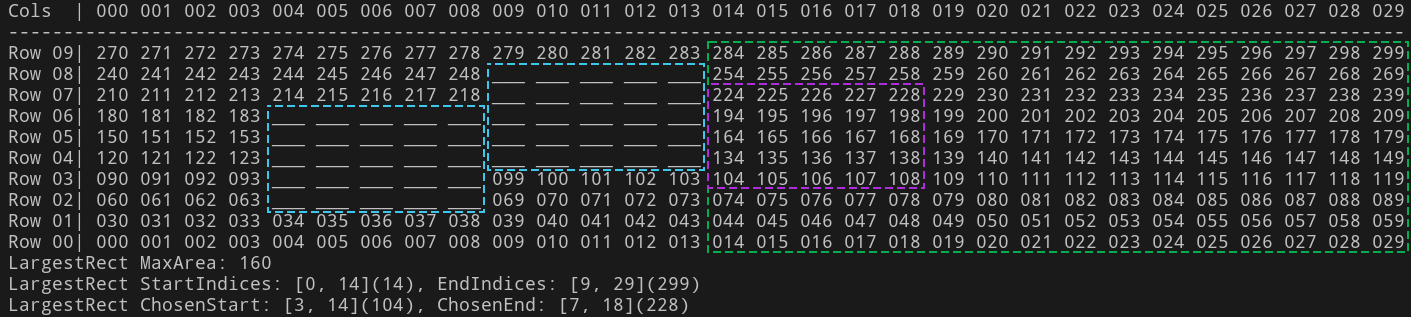
Figure 7:
Console output visualizing Spawn Area statesThe light-blue dashed boxes indicate where the two previous grid blocks spawned, and each Spawn Area in these boxes are flagged as recent. The green dashed box represents the largest rectangle found, while the purple dashed box shows the grid block that was chosen.
RandomGridBlock and NearbyGridBlock attempt to spawn groups of targets in the most compact arrangement possible using the following procedure:
- Compute all possible dimensions for the grid block. For example, groups of 25 targets have dimensions or factors of 5x5 and 1x25.
- Use a modified version of the Largest Rectangle in a Histogram algorithm to identify rectangles that can accommodate any of the grid block dimensions found earlier.
- After obtaining the rectangles, select one that fits a grid block with dimensions having the smallest differences between them. This heuristic ensures the most compact arrangement.
- Once the rectangle is chosen, determine the location and orientation of the grid block within the rectangle. For NearbyGridBlock, it will attempt to select a location that borders a recent Spawn Area.
Figure 8 illustrates that sometimes the absolute largest rectangle does not accommodate the desired target formation. Figure 8.1 shows that the absolute largest rectangle could only fit a 1x25 grid block. Figure 8.2 shows why multiple rectangles are considered, prioritizing those that can fit more compact grid blocks.

Figure 8.1:
The largest rectangle of valid Spawn Areas.Spawn Area Sizing
- Static: The total spawn area size does not change.
- Dynamic: The total spawn area size shrinks or grows based on the number of targets consecutively hit.
The Bounds Scaling Policy determines how to change the total spawn area size throughout the game mode. There are two types:
If the Bounds Scaling Policy is Dynamic, the Target Manager interpolates the current size of the total spawn area between the Minimum Spread and Maximum Spread for each direction (Horizontal, Vertical, and Forward). The spread is calculated using the current number of consecutively hit targets, the Start Threshold, and the End Threshold. The spread value is then rounded down to the nearest multiple of a Spawn Area, and the Spawn Area Manager updates the state of the Spawn Areas that are within the current total spawn area. The red Spawn Areas shown in Figure 9 are those outside of the current total spawn area.
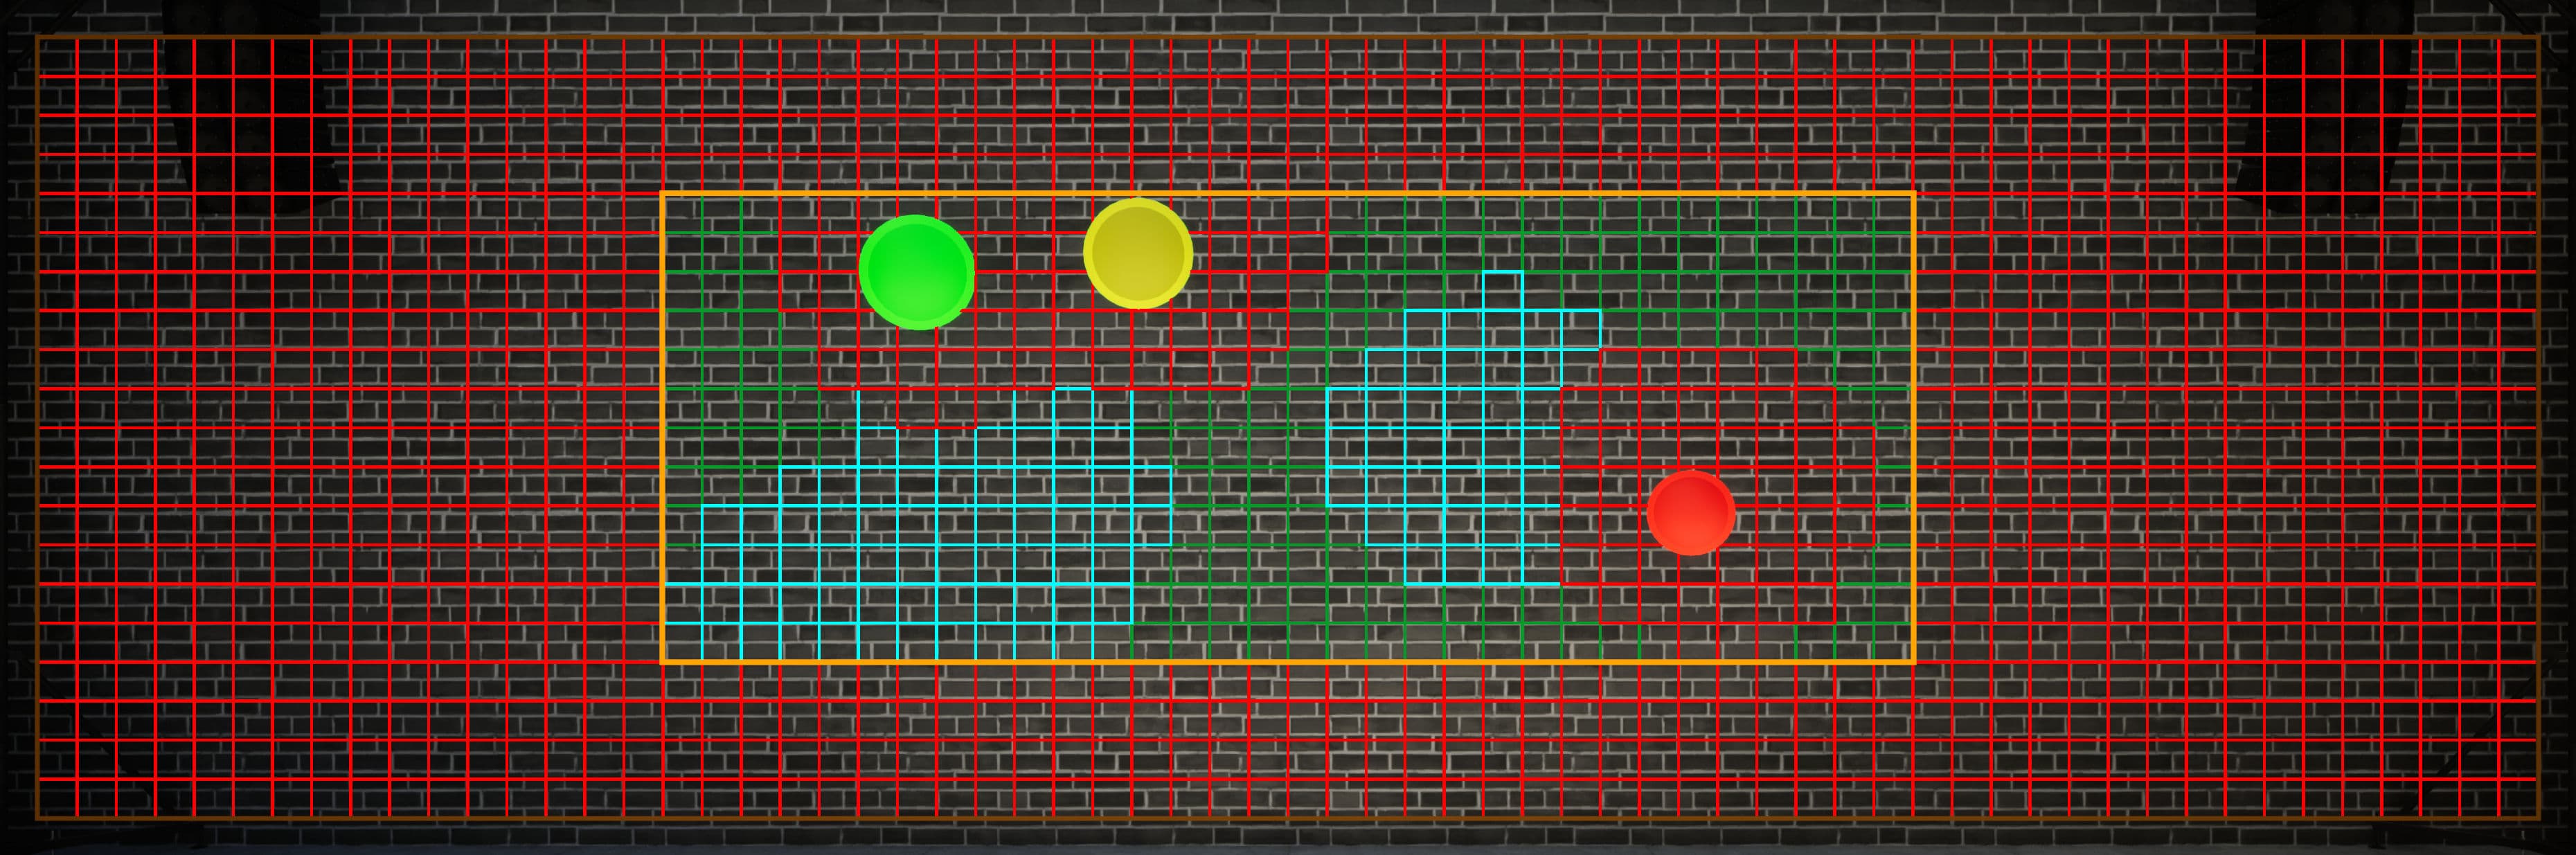
Figure 9:
The current total spawn area inside the total spawn areaConclusion
The system I have described is by no means the only way to approach the problem; it is simply the method that made the most sense to me and worked effectively. I hoped you learned something and weren't too overwhelmed. Part 2 of the Target Spawning System series builds upon the classes and conventions introduced here, as key functions and their roles are outlined throughout the target lifecycle.
Check out Part 2 here!
Posted: July 2, 2023